Kachelformat im Kurs einsetzen
Use Tiles course format
Ziele:
In dieser Anleitung erfahren Sie, wie man das Kachelformat im Kurs einsetzen und bearbeiten kann. Darüber hinaus lernen Sie verschiedene Einstellungsmöglichkeiten des Kachelformats kennen.
Schwierigkeit: einfach
Gültig ab Moodle Version 4.4
Goals:
In this guide, you will learn how to use and edit the Tile format in the course. You will also learn about the various settings options for the Tile format.
Difficulty: easy
Valid from Moodle version 4.4
8 Schritte:
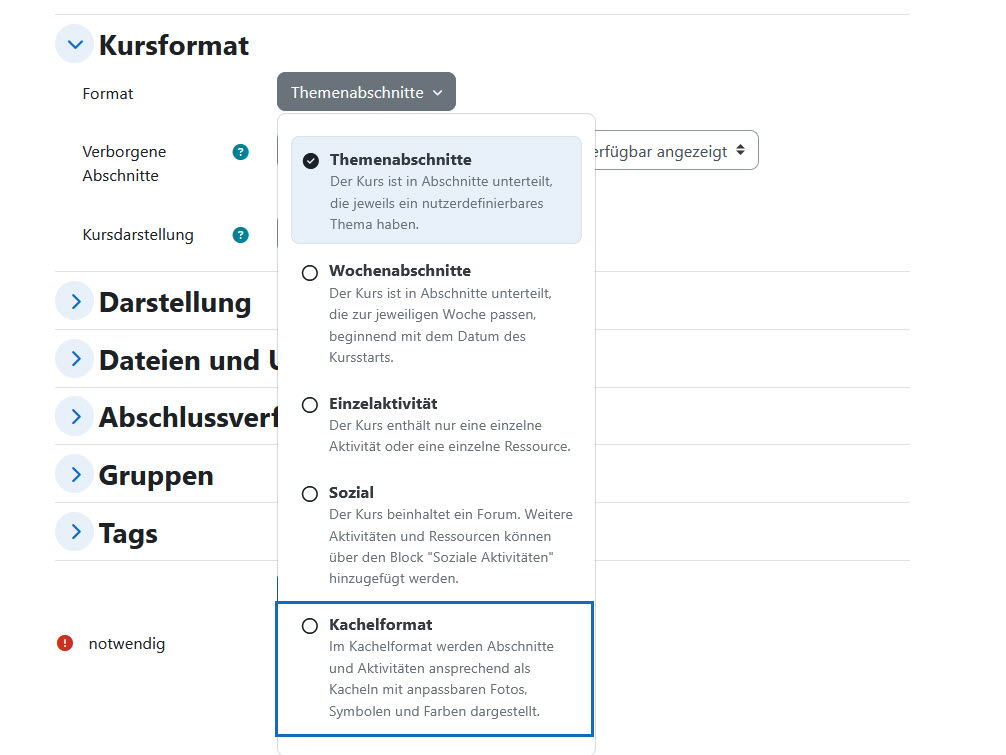
Kurseinstellungen öffnen
Um das Format Ihres Kurses zu ändern, klicken Sie auf „Einstellungen" und wählen Sie im Abschnitt „Kursformat" beim Parameter „Format" im Drop-down Menü „Kachelformat" aus.
Jeder Abschnitt Ihres Kurses wird dadurch zu einer Kachel umgewandelt. Das Kursformat können Sie jederzeit wieder rückgängig machen. Im nächsten Schritt werden die Einstellungen des Kachelformats genauer erklärt.
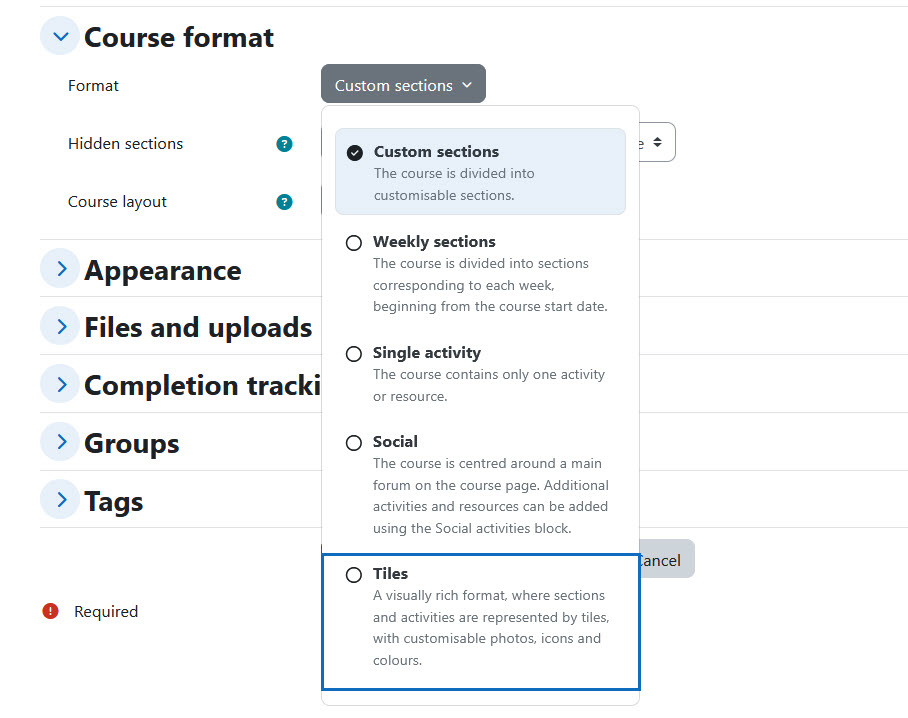
Open the course settings
To change the format of your course, click on"Settings" and select "Tiles" in the "Course format" section from the drop-down menu for the "Format" parameter.
Each section of your course will be converted into a tile. You can reverse the course format at any time.The Tile format settings will be explained in more detail in the next step.
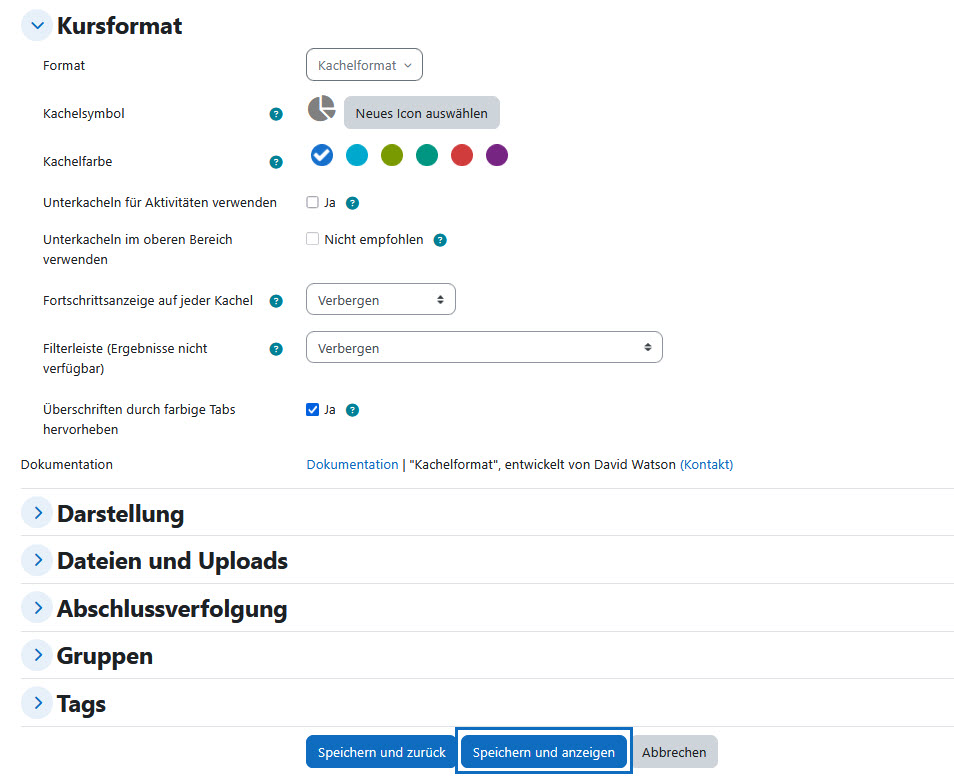
Einstellungen zum Kachelformat festlegen
Beim Kachelformat können Sie verschiedene individuelle Einstellungen festlegen:
- Kachelsymbol: Hier können Sie zwischen verschiedenen Symbolbildern wählen, die in den Kacheln angezeigt werden. Um ein anderes Icon auszuwählen, klicken Sie bitte auf den Button „Neues Icon auswählen".
- Kachelfarbe: Sie können aus einer vorgegebenen Farbpalette wählen.
- Unterkacheln für Aktivitäten verwenden: Wenn Sie diesen Parameter aktivieren, werden Aktivitäten oder Materialien als Unterkacheln statt in Listenform angezeigt.
- Unterkacheln im oberen Bereich verwenden: Mit dieser Funktion werden im obersten Kursabschnitt alle Aktivitäten oder Materialien in Unterkacheln angezeigt. Wenn Sie in diesem Bereich viele Elemente verwenden, könnte es damit unübersichtlich werden.
- Fortschrittsanzeige auf jeder Kachel: Wenn Sie die Abschlussverfolgung aktiviert haben, können Sie den Fortschritt auf jeder Kachel entweder anzeigen oder verbergen. Für weitere Informationen siehe die Anleitung Aktivitäts- und Kursabschluss setzen.
- Filterleiste (Ergebnisse nicht verfügbar): Wenn Sie nummerierte Kacheln haben, können Sie mit dieser Funktion einen Filter aktivieren und so nach den Nummern auf den Kacheln filtern.
- Überschriften durch farbige Tabs hervorheben: Wenn Sie diesen Parameter aktivieren, wird jeder Text, den Sie in einem Text- und Medienfeld als „Überschrift“ formatieren, mit einem farbigen Tab hervorgehoben.
Wenn Sie alle Einstellungen gewählt haben, speichern Sie am Seitenende mit „Speichern und anzeigen".
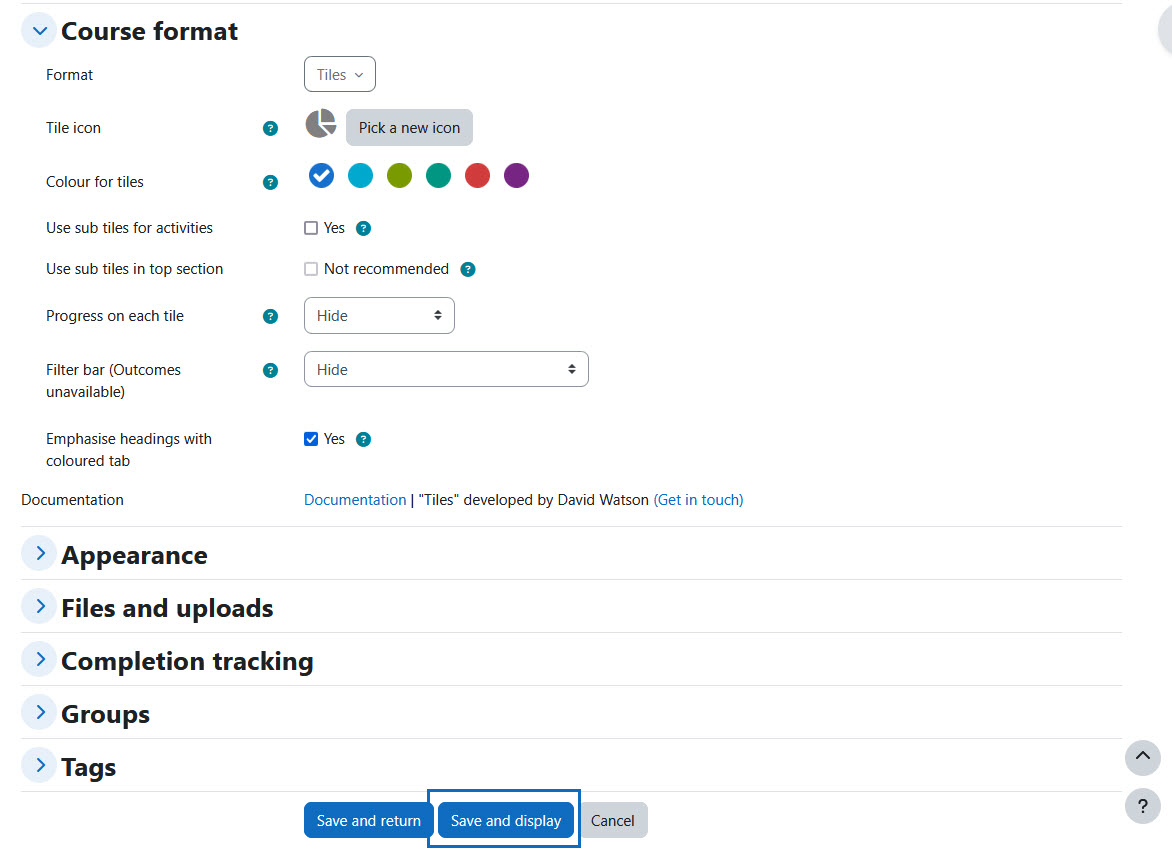
Edit the settings of the Tile format
You can define various individual settings for the Tile format:
- Tile icon: Here you can choose between different icon images that are displayed in the tiles. To select a different icon, please click the "Pick a new icon" button.
- Colour for tiles: You can choose from a predefined color palette.
- Use sub tiles for activities: When you enable this parameter, activities or materials appear as sub tiles instead of a list.
- Use sub tiles in top section: This feature displays all activities or materials in sub tiles in the top course section. If you use a lot of items in this section, it could make it cluttered.
- Progress on each tile: If you have enabled completion tracking, you can choose to show or hide the progress on each tile. For more information, see the Set activity and course completion guide.
- Filter bar (outcomes unavailable): If you have numbered tiles, this feature allows you to enable a filter in order to filter by the numbers on the tiles.
- Emphasise headings with coloured tabs: If you activate this parameter, any text you format as a "heading" in a text or media field will be highlighted with a coloured tab.
When you have selected all the settings, save them at the bottom of the page by clicking "Save and display".
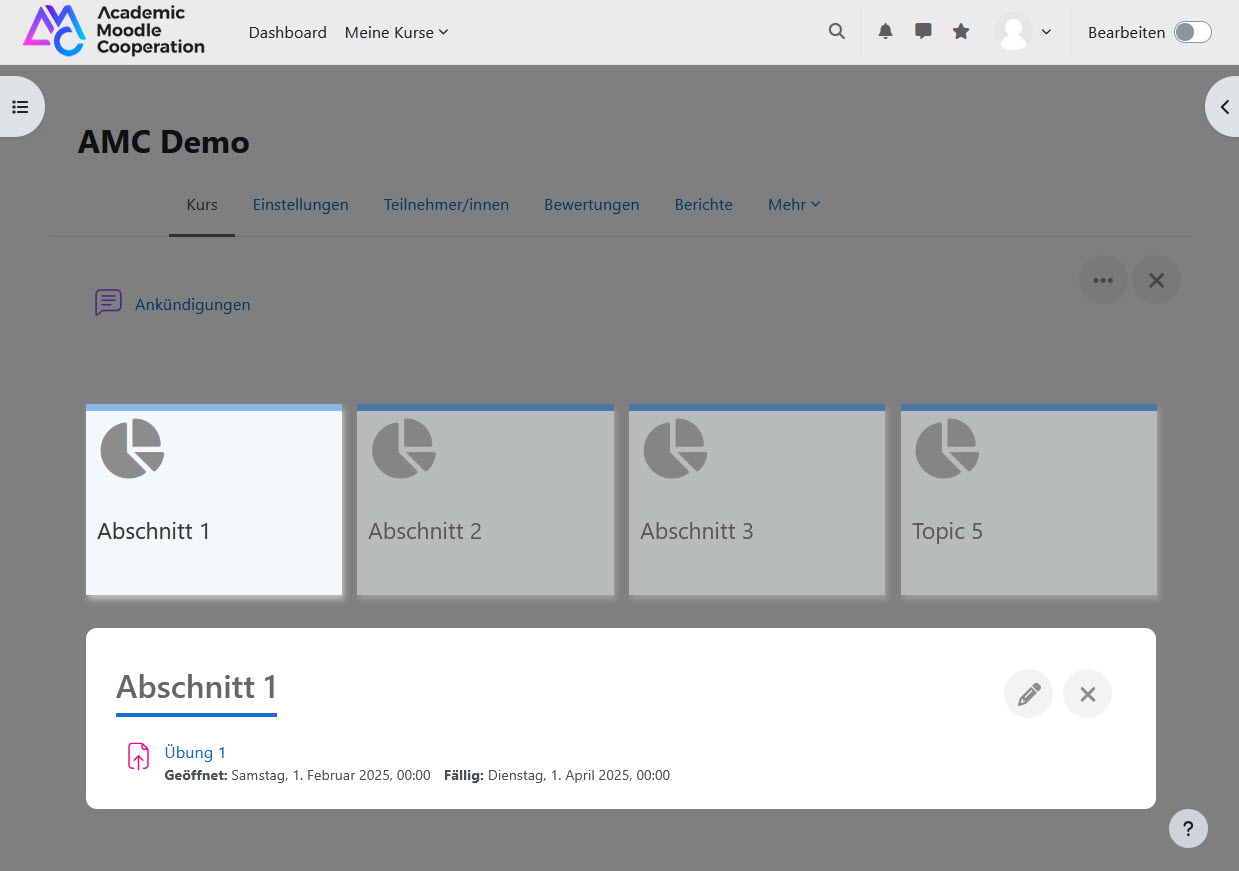
Übersicht der Kacheln
Sie sehen nun eine Übersicht der im Kurs vorhandenen Kacheln. Die Anzahl entspricht der Kursabschnitte Ihres Kurses. Die Kacheln sind auch links in der Navigationsleiste zu sehen.
Wenn Sie auf eine Kachel klicken, klappt diese auf. Wenn es in Ihrem Kurs bereits Inhalte gab, dann sehen Sie diese jetzt in der aufgeklappten Kachel. Sollten Ihr Kurs noch leer sein, sind auch die Kacheln leer.
Im nächsten Schritt wird gezeigt, wie Sie die Kacheln bearbeiten können.
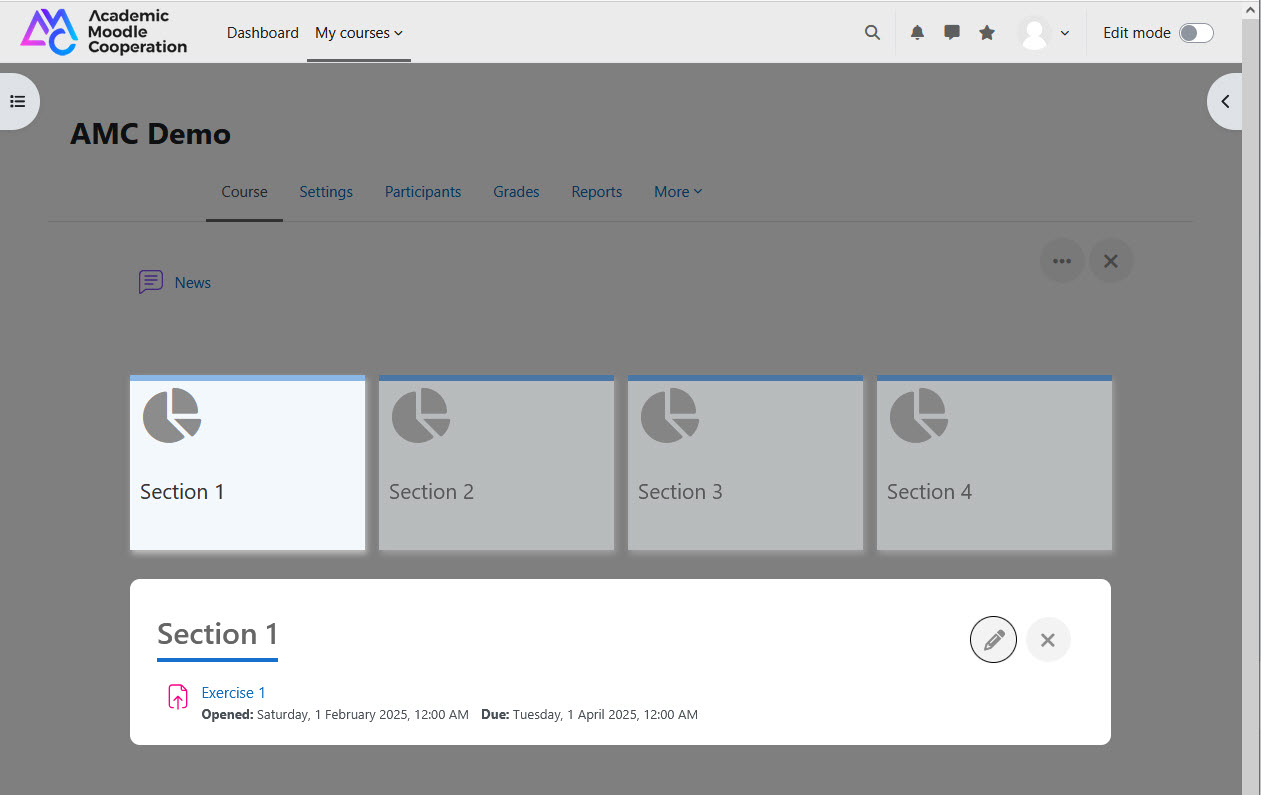
Overview of the tiles
You will now see an overview of the tiles available in the course. The number corresponds to the course sections of your course. The tiles can also be seen in the navigation bar on the left.
If you click on a tile, it will expand. If your course already has content, you will see it in the expanded tile. If your course is empty, the tiles will also be empty.
The next step shows how to edit the tiles.
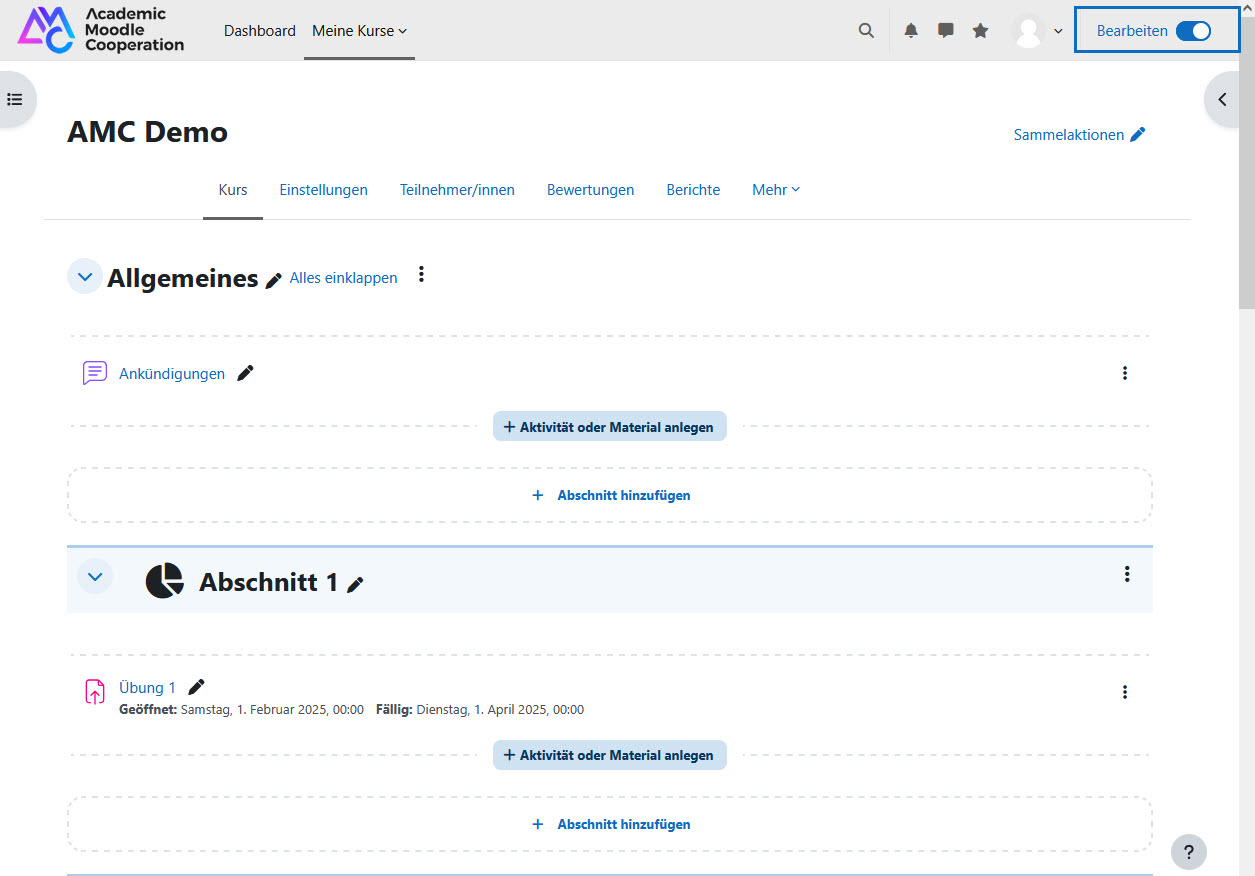
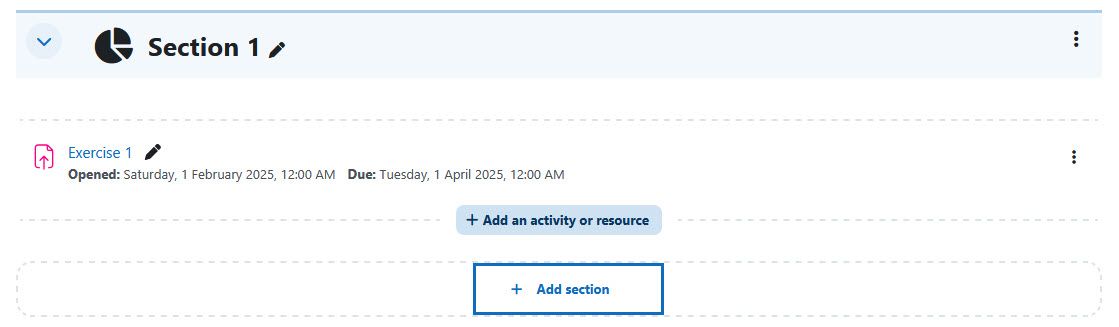
Kacheln bearbeiten
Um die Kacheln zu bearbeiten, wechseln Sie mit dem Schieberegler in den Bearbeitungsmodus. Die Kacheln wechseln dann zu einer Listenansicht. Mit Hilfe des Stiftsymbols können Sie im jeweiligen Abschnitt den Titel bearbeiten sowie Aktivitäten oder Materialien hinzufügen. Sobald Sie die Bearbeitung wieder ausschalten, gelangen Sie zur ursprünglichen Kachelansicht zurück.
Tipp: Sollten Sie nur eine einzelne Kachel bearbeiten wollen, können Sie die jeweilige Kachel öffnen und direkt auf das Stiftsymbol rechts oben klicken. Dann gelangen Sie direkt in den Bearbeitungsmodus für die betreffende Kachel.
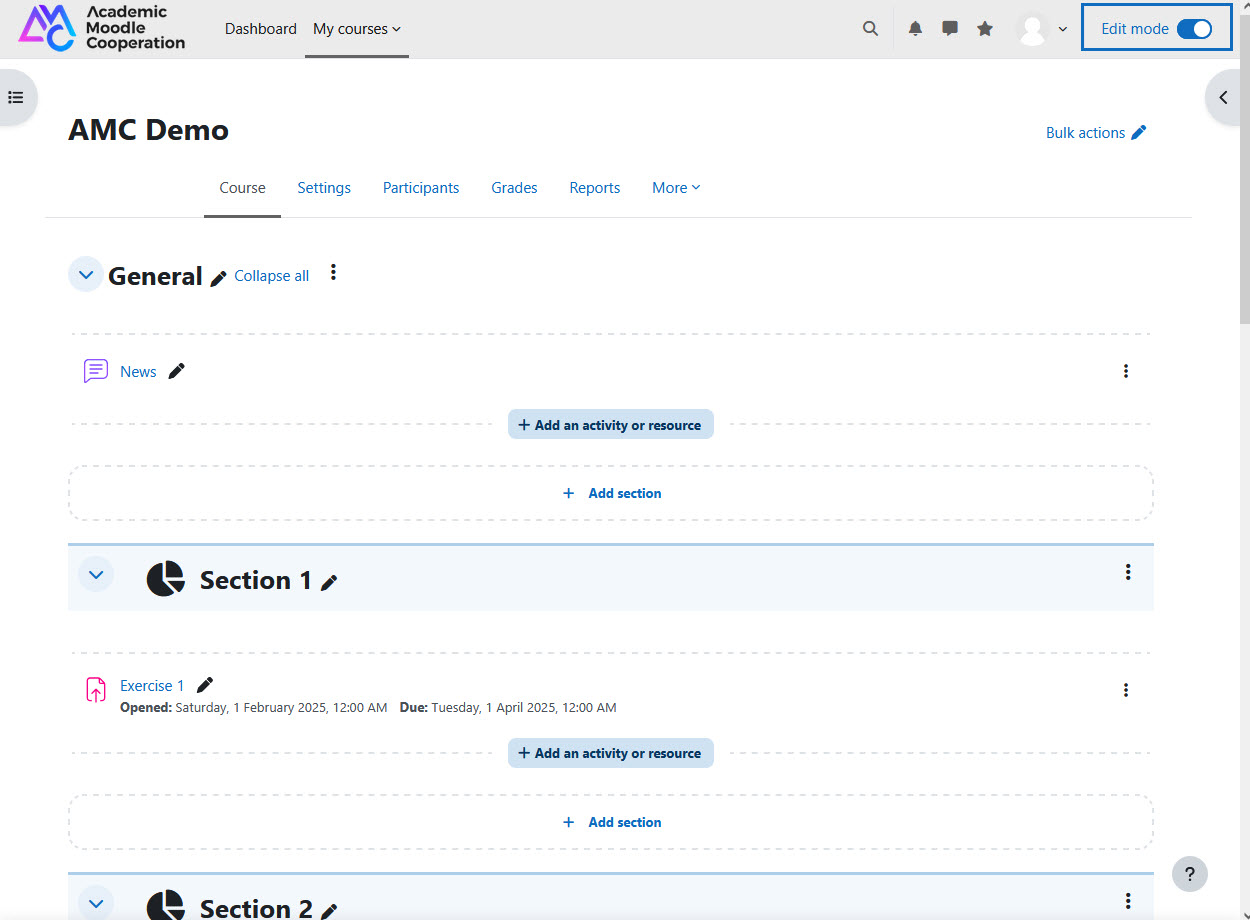
Edit the tiles
To edit the tiles, switch to edit mode using the toggle. The tiles then switch to a list view. You can use the pencil icon to edit the title in the respective section and add activities or materials. As soon as you switch off the edit function again, you will return to the original tile view.
Tip: If you only want to edit a single tile, you can open the respective tile and click directly on the pen symbol in the top right corner. This will take you directly to the editing mode for the tile you want to edit.
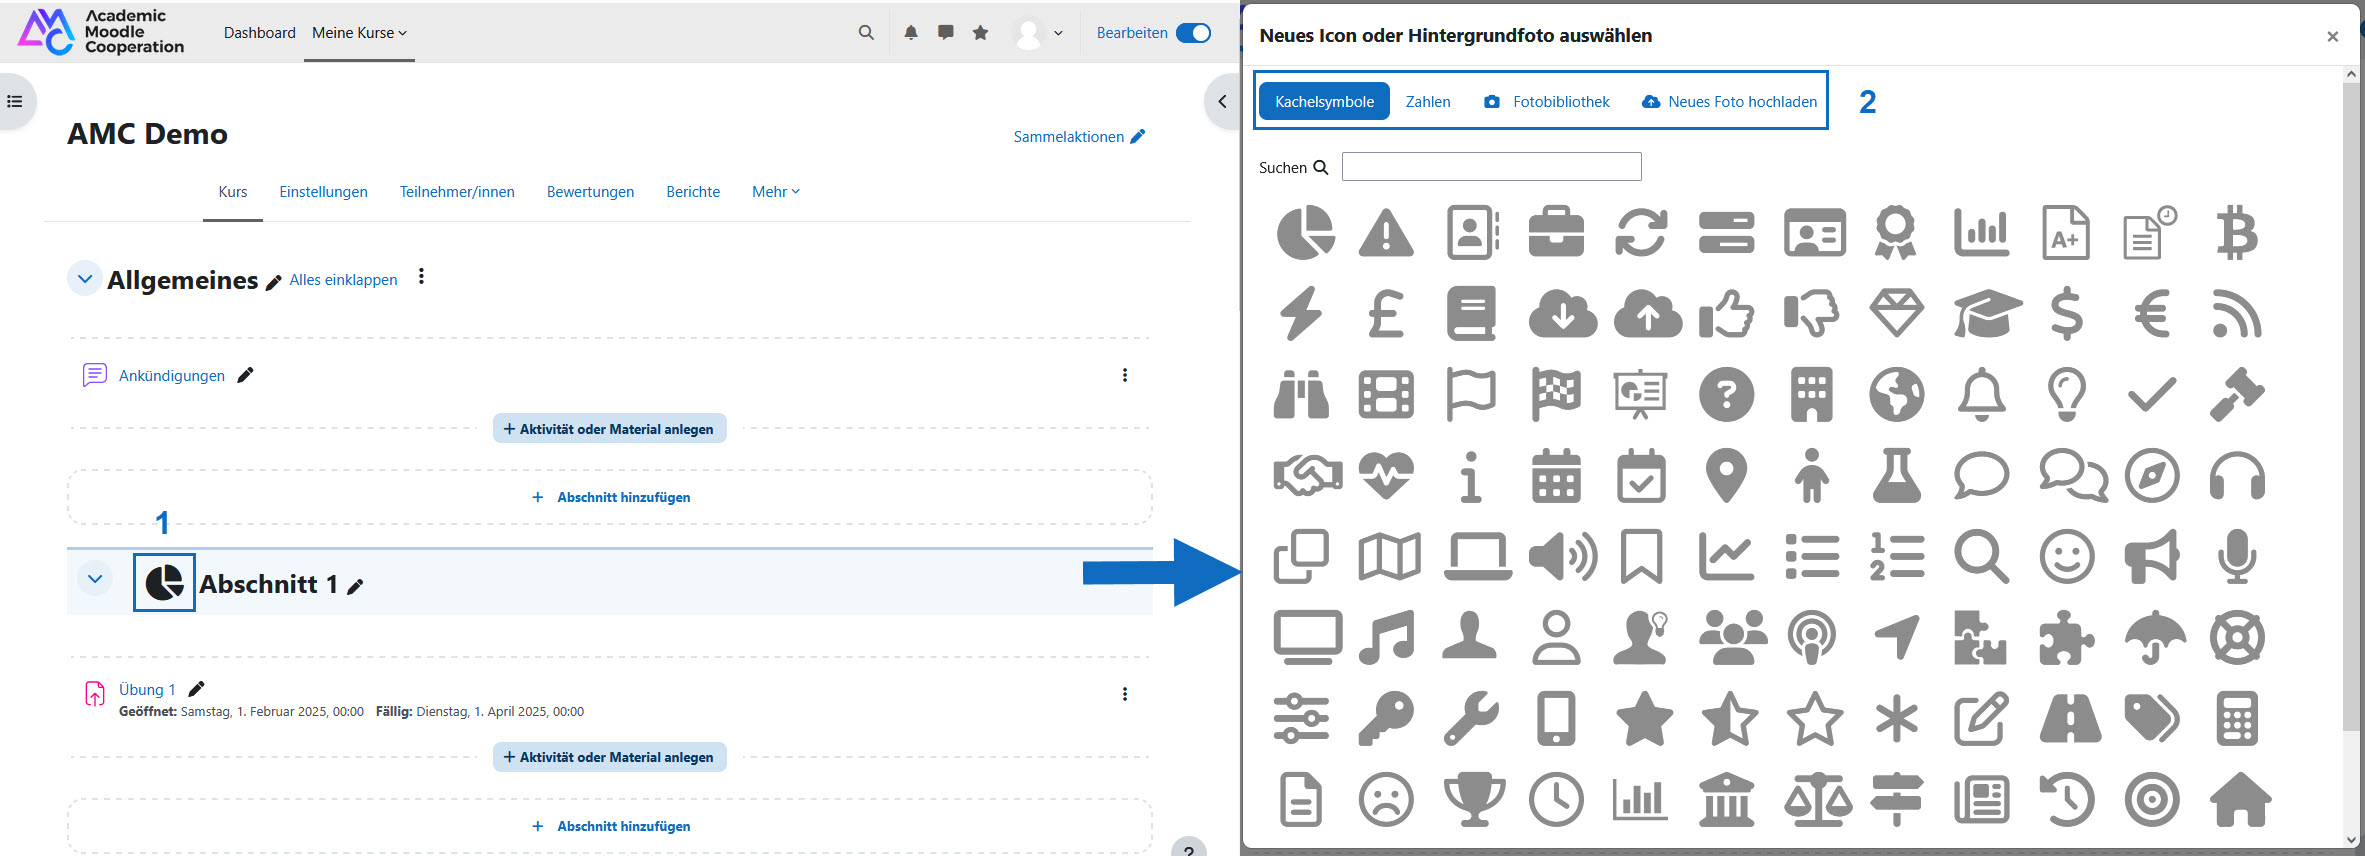
Optional: Individuelle Kachelbilder festlegen
Um ein individuelles Kachelbild festzulegen, klicken Sie bitte auf das Icon. Es öffnet sich nun ein neues Fenster.
Folgende Elemente können Sie für Ihr Kachelbild verwenden:
- ein vorgegebenes Kachelsymbol
- eine vorgegebene Zahl
- ein Foto aus Ihrer Fotobibliothek (hier sind alle Bilder enthalten, die in Ihrem Kurs als Kachelbild hochgeladen wurden)
- ein neues Foto, das Sie hochladen
Hinweis: Wenn Sie sich dafür entscheiden, ein neues Bild hochzuladen, achten Sie darauf, dass Sie ein Bild im Querformat wählen.
Optional: Set customized tile images
To set an custom tile image, please click on the icon. A new window will now open.
You can use the following elements for your tile image:
- a predefined tile icon
- a predefined number
- a photo from your photo library (this includes all photos that have been uploaded to your course as a tile image)
- a new photo that you upload
Note: If you choose to upload a new image, make sure you select a vertical format imgage.
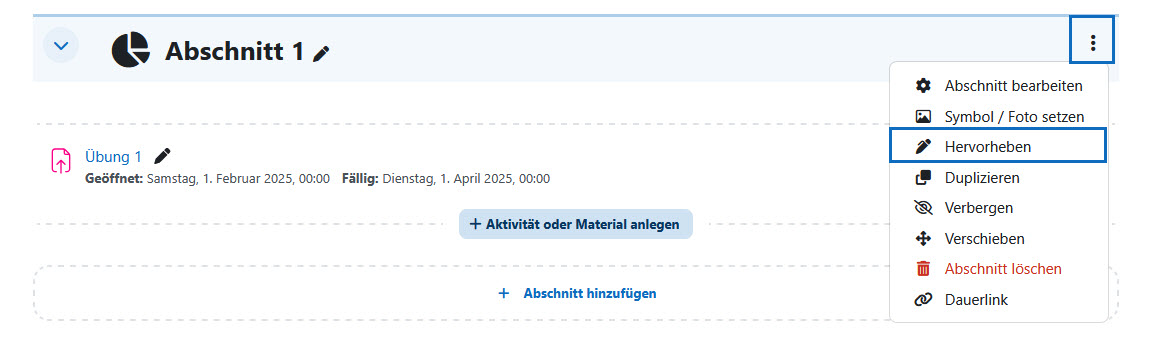
Optional: Kacheln hervorheben
Bei Bedarf können Sie auch einzelne Kacheln hervorheben. Diese werden dann farblich hervorgehoben und sind beim Öffnen der Kachel durch das Label „Hervorgehoben" gekennzeichnet.
Um einen Abschnitt hervorzuheben, klicken Sie bitte im Bearbeitungsmodus beim jeweiligen Abschnitt rechts auf das Aktionsmenü „..." . Wählen Sie nun die Funktion „Hervorheben" aus. Sie können diese Funktion jederzeit entfernen, indem Sie auf „Hervorhebung entfernen" klicken.
Hinweis: Es ist immer nur möglich, einen Abschnitt hervorzuheben. Diese Funktion eignet sich, wenn Sie beispielsweise Abschnitte mit wichtigen Informationen oder mit aktuellen Kursinhalten hervorheben möchten.
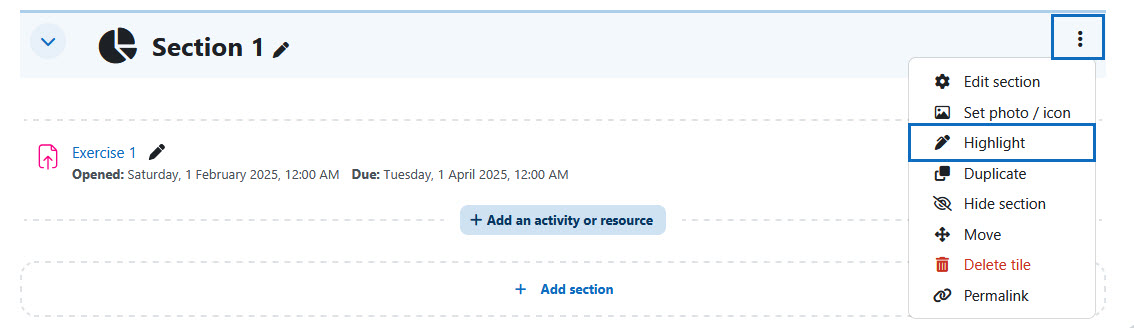
Optional: Highlight tiles
If necessary, you can also highlight individual tiles. These are then highlighted in colour and marked with the label “Highlighted” when the tile is opened.
To highlight a section, please click on the "..." action menu on the right in edit mode for the respective section. Now select the "Highlight" function. You can remove this function at any time by clicking on "Unhighlight".
Note: It is only possible to highlight one section at a time. This function is useful if you want to highlight sections with important information or with current course content, for example.
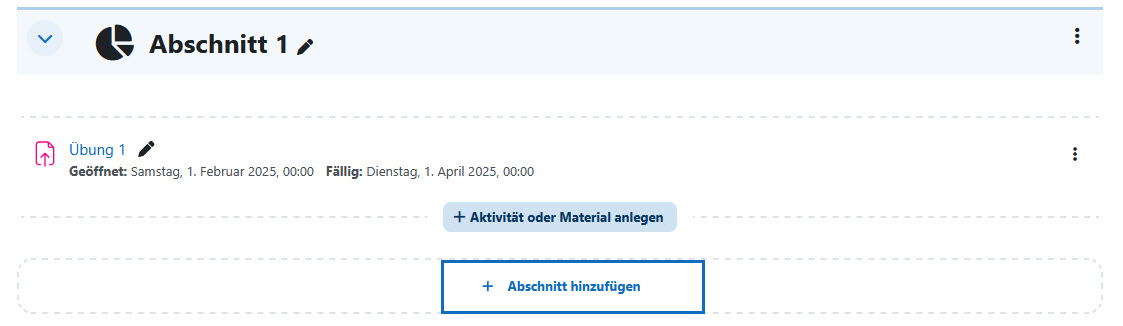
Weitere Kacheln hinzufügen
Wenn Sie weitere Kacheln hinzufügen möchten, klicken Sie im Bearbeitungsmodus auf „+ Abschnitt hinzufügen". Die neuen Kacheln scheinen dann in der Übersicht auf und Sie können diese weiter bearbeiten.
Tipp: Über das Aktionsmenü „..." beim jeweiligen Abschnitt können Sie auch die Funktion „Duplizieren" aufrufen und so einzelne Kacheln, die Sie bereits vorbereitet haben, duplizieren.
Add more tiles
If you want to add more tiles, click on "+ Add Section" in edit mode. The new tiles will then appear in the overview and you can edit them further.
Tip: You can also use the "..." action menu for the respective section to access the "Duplicate" function and thus duplicate individual tiles that you have already prepared.
Weitere Informationen
Bei Fragen zur Barrierefreiheit wenden Sie sich bitte an die entsprechende Supporteinrichtung Ihrer Hochschule.
Dieses Werk steht unter einer Creative Commons Attribution-ShareAlike 4.0 Lizenz:
https://creativecommons.org/licenses/by-sa/4.0/
![]() Das Kachelformat (Tiles format) ist ein 3rd Party Plugin (Das Plugin kann hier im Detail angesehen und heruntergeladen werden)
Das Kachelformat (Tiles format) ist ein 3rd Party Plugin (Das Plugin kann hier im Detail angesehen und heruntergeladen werden)
Further information
If you have any questions regarding accessibility, please contact the relevant support facility at your university.
This work is licensed under a Creative Commons Attribution-ShareAlike 4.0 License:
https://creativecommons.org/licenses/by-sa/4.0/
![]() The Tiles format is a 3rd Party Plugin (The plugin can be viewed and downloaded in detail here)
The Tiles format is a 3rd Party Plugin (The plugin can be viewed and downloaded in detail here)